HOW TO INSTALL ORACLE JAVA 8 / JAVA 9 ( JAVA JDK ) ON UBUNTU 16.04

HOW TO INSTALL ORACLE JAVA 8 / JAVA 9 ( JAVA JDK ) ON UBUNTU 16.04
Introduction
In this article we are going to learn how to install Oracle Java ( Java JDK ) on Ubuntu 16.04. Java is a programming language like any other programming language i.e c++, c, Python…etc. First time Java was invented by James Gosling on year 1991 and First time it was realsed by Sun Microsystem on year 1995. First released version of java was java 1.0. Today in Real World java has taken a major place and almost each and everywhere you will able to find java like Websites, Electronic devices (eg: TV, Mobiles..etc..), Applications/Softwares and many more. Here in this article I will cover installation steps for both the Oracle Java ( Java JDK ) version i.e. Java 8 and Java 9.
So Follow the below steps to Install Oracle Java (Java JDK) on Ubuntu 16.04 :
Step : 1 ADD Repository for Java
First we have to add repository for Java, So let’s do so by using below command.
helpdesk@ubuntu:~$ sudo add-apt-repository ppa:webupd8team/java   # Add Repository for Java
[sudo] password for helpdesk:
 Oracle Java (JDK) Installer (automatically downloads and installs Oracle JDK7 / JDK8 / JDK9). There are no actual Java files in this PPA.

More info (and Ubuntu installation instructions):
- for Oracle Java 7: http://www.webupd8.org/2012/01/install-oracle-java-jdk-7-in-ubuntu-via.html
- for Oracle Java 8: http://www.webupd8.org/2012/09/install-oracle-java-8-in-ubuntu-via-ppa.html

Debian installation instructions:
- Oracle Java 7: http://www.webupd8.org/2012/06/how-to-install-oracle-java-7-in-debian.html
- Oracle Java 8: http://www.webupd8.org/2014/03/how-to-install-oracle-java-8-in-debian.html

Oracle Java 9 (for both Ubuntu and Debian): http://www.webupd8.org/2015/02/install-oracle-java-9-in-ubuntu-linux.html

For JDK9, the PPA uses standard builds from: https://jdk9.java.net/download/ (and not the Jigsaw builds!).

Important!!! For now, you should continue to use Java 8 because Oracle Java 9 is available as an early access release! You should only use Oracle Java 9 if you explicitly need it, because it may contain bugs and it might not include the latest security patches! Also, some Java options were removed in JDK9, so you may encounter issues with various Java apps. More information and installation instructions (Ubuntu / Linux Mint / Debian): http://www.webupd8.org/2015/02/install-oracle-java-9-in-ubuntu-linux.html
 More info: https://launchpad.net/~webupd8team/+archive/ubuntu/java
Press [ENTER] to continue or ctrl-c to cancel adding it

gpg: keyring `/tmp/tmpwww9phn2/secring.gpg' created
gpg: keyring `/tmp/tmpwww9phn2/pubring.gpg' created
gpg: requesting key EEA14886 from hkp server keyserver.ubuntu.com
gpg: /tmp/tmpwww9phn2/trustdb.gpg: trustdb created
gpg: key EEA14886: public key "Launchpad VLC" imported
gpg: no ultimately trusted keys found
gpg: Total number processed: 1
gpg:               imported: 1  (RSA: 1)
OK
Step : 2 Update Packages and Repositories
After adding the repository for java update packages and repositories using sudo apt-get update command. Refer the sample output below. Here you will able to see the newly added repository for java.
helpdesk@ubuntu:~$ sudo apt-get update   # Update all Packages and Repositories
Get:1 http://security.ubuntu.com/ubuntu xenial-security InRelease [102 kB]
Get:2 http://ppa.launchpad.net/webupd8team/java/ubuntu xenial InRelease [17.6 kB]
Get:3 http://ppa.launchpad.net/webupd8team/java/ubuntu xenial/main i386 Packages [2,884 B]
Get:4 http://ppa.launchpad.net/webupd8team/java/ubuntu xenial/main Translation-en [1,260 B]
Hit:5 http://us.archive.ubuntu.com/ubuntu xenial InRelease
Hit:6 http://us.archive.ubuntu.com/ubuntu xenial-updates InRelease
Hit:7 http://us.archive.ubuntu.com/ubuntu xenial-backports InRelease
Fetched 124 kB in 2s (53.9 kB/s)
Reading package lists... Done
Step : 3 Install Oracle Java (Java JDK)
Now go ahead and install java 9 using below command
helpdesk@ubuntu:~$ sudo apt-get install oracle-java9-installer   # Install Java 9
Reading package lists... Done
Building dependency tree
Reading state information... Done
The following additional packages will be installed:
  gsfonts-x11 java-common oracle-java9-set-default
Suggested packages:
  binfmt-support visualvm ttf-baekmuk | ttf-unfonts | ttf-unfonts-core
  ttf-kochi-gothic | ttf-sazanami-gothic ttf-kochi-mincho
  | ttf-sazanami-mincho ttf-arphic-uming
The following NEW packages will be installed:
  gsfonts-x11 java-common oracle-java9-installer oracle-java9-set-default
0 upgraded, 4 newly installed, 0 to remove and 453 not upgraded.
Need to get 50.0 kB of archives.
After this operation, 266 kB of additional disk space will be used.
Do you want to continue? [Y/n] y
Also Read :
- HOW TO INSTALL WORDPRESS 4.6.1 WITH LAMP STACK ON UBUNTU 16.04
- HOW TO INSTALL LAMP STACK ON UBUNTU 16.04
- HOW TO INSTALL GOOGLE CHROME IN UBUNTU 16.04
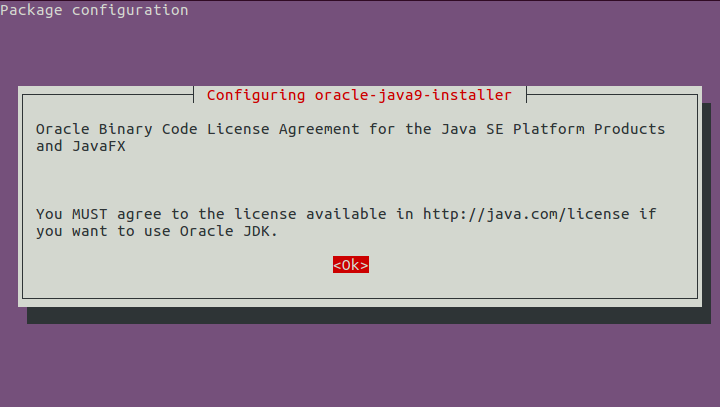
During installation you have to agree with the License Agreement of Oracle Java (Java JDK), Find the snapshot’s below.
Snap : 1 – Click Ok to go for further step.

Installing Oracle Java (Java JDK)
Snap : 2 – Select Yes to Accept the License Agreement.

Installing Oracle Java (Java JDK)
As you can see below on sample output the Oracle Java 9 Installed Successfully.
Oracle JDK 9 installed

#####Important########
To set Oracle JDK9 as default, install the "oracle-java9-set-default" package.
E.g.: sudo apt install oracle-java9-set-default.
Selecting previously unselected package oracle-java9-set-default.
(Reading database ... 172472 files and directories currently installed.)
Preparing to unpack .../oracle-java9-set-default_9b162-1~webupd8~0_all.deb ...
Unpacking oracle-java9-set-default (9b162-1~webupd8~0) ...
Selecting previously unselected package gsfonts-x11.
Preparing to unpack .../gsfonts-x11_0.24_all.deb ...
Unpacking gsfonts-x11 (0.24) ...
Processing triggers for fontconfig (2.11.94-0ubuntu1) ...
Setting up oracle-java9-set-default (9b162-1~webupd8~0) ...
Setting up gsfonts-x11 (0.24) ...
To Install Oracle Java 8 use below command.
elinuxbook@ubuntu:~$ sudo apt-get install oracle-java8-installer # To install Java 8
Step : 4 Set Default Version of Oracle Java
After Installation set the Java 9 as a default Oracle Java Version using below command.
helpdesk@ubuntu:~$ sudo apt-get install oracle-java9-set-default   # Set Java 9 as a Default Java Version
Reading package lists... Done
Building dependency tree
Reading state information... Done
oracle-java9-set-default is already the newest version (9b162-1~webupd8~0).
oracle-java9-set-default set to manually installed.
0 upgraded, 0 newly installed, 0 to remove and 453 not upgraded.
To make Oracle Java 8 as a default Oracle Java Version refer the below command.
sudo apt-get install oracle-java8-set-default # To set Java 8 as a default Java Version
After Installation to confirm the java version use below commands.
helpdesk@ubuntu:~$ java -version   # Confirm Java Version
java version "9-ea"
Java(TM) SE Runtime Environment (build 9-ea+162)
Java HotSpot(TM) Server VM (build 9-ea+162, mixed mode)

helpdesk@ubuntu:~$ javac -version   # Confirm Java Version
javac 9-ea
Here java command shows you the JDK version you have Installed and javac command shows you the compiler version of java you installed.
If you have installed Java 8 then you will able receive the output as shown below.
helpdesk@ubuntu:~$ javac -version
javac 1.8.0_131

helpdesk@ubuntu:~$ java -version
java version "1.8.0_131"
Java(TM) SE Runtime Environment (build 1.8.0_131-b11)
Java HotSpot(TM) Client VM (build 25.131-b11, mixed mode)
So This is how we can install Oracle Java 8 / Java 9 ( Java JDK ) on Ubuntu 16.04.
If you found this article useful then Like Us, Share Us, Subscribe our Newsletter OR if you have something to say then feel free to comment on the comment box below.


